Guides / Choosing a Supplier
Bending Veneer for Curved Parts: Backers, Grain Direction and Bent Lamination
November 4, 2026
A curve is where veneer shows both its strength and its weakness. A thin leaf can wrap around a radius that would snap solid lumber, which is why curved cabinet fronts, chair backs and round columns are often veneered. Push the same leaf too far, or bend it the wrong way, and it splits along the grain.
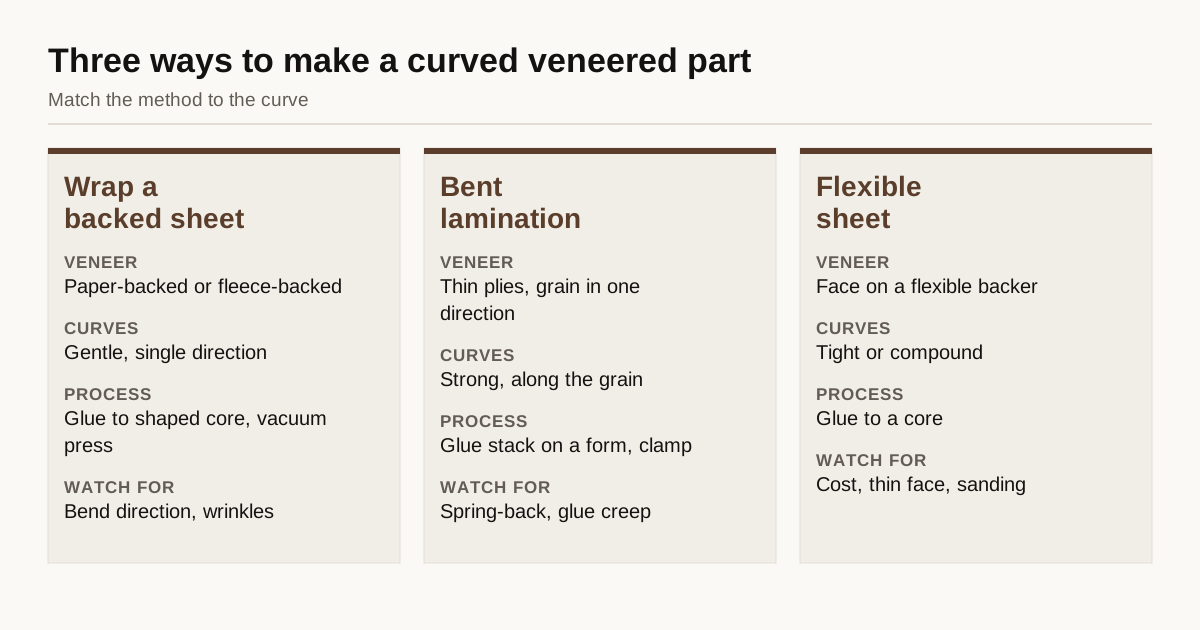
This guide explains the three main ways veneer is used on curved parts, how grain direction and backing control the result and what to specify so the veneer you buy bends the way your design needs.
Why veneer bends and where it stops
Wood is made of fibers that run along the grain. Bending along the grain, with the fibers stretching on the outside and compressing on the inside of the curve, works well in thin sections, because a thin leaf has little distance between the outside and the inside. Bending across the grain, with the curve axis parallel to the fibers, pulls the fibers apart sideways, and the leaf splits easily.
Four things set the limit:
- Thickness. The thinner the leaf, the tighter the curve it can follow.
- Direction. Along the grain is much easier than across.
- Moisture and softness. A leaf at a suitable moisture content bends better than a very dry one. Heat and steam soften wood for tighter bends in some processes.
- Species and figure. Straight-grain woods bend better than figured woods, and burls and curly woods are fragile.
There is no universal minimum radius. Testing on your own stock is the reliable method, as the FAQ above explains.
Three ways to make curved veneered parts
Wrapping a backed sheet around a shaped core
A core is cut or molded to the curved shape, and a flexible veneer sheet is glued around it. Paper-backed and fleece-backed sheets are made for this, because the backer holds the face together as it bends. The method suits gentle curves, such as rounded corners on cabinets, curved fronts and column wraps. Sheets are pressed with a vacuum bag, a flexible membrane or a form press, depending on the shape.
The guide on vacuum press versus hot press explains why vacuum pressing suits shaped parts, since air pressure follows the contour.
Bent lamination
Bent lamination glues several thin plies together over a form, so the curve is built into the part. Veneer or thin strips, often in the range of about 1 to 3 mm, are coated with glue, stacked with the grain running in the same direction and clamped on a mold until the glue sets. When the clamps come off, the part keeps its shape and is strong along the curve.
Typical uses are chair backs, armrests, curved door rails, arches and curved panels. A visible face veneer can be added to the outer layer. Bent lamination uses more veneer than wrapping, and the plies must be cut to the right width and length, so the supplier needs to know the part dimensions.
The success of a bent lamination depends on ply thickness, grain, glue and form design. Thinner plies bend tighter but need more layers and more glue.
Flexible veneer sheets
Some makers sell veneer on a flexible backer made to bend in both directions, including across the grain. These sheets let designers wrap tight or compound curves that raw leaves cannot follow. They cost more than standard backed sheets and have thinner faces, so sanding margin is small. Check the maker’s data for the minimum radius and the adhesive requirements, and test a sample.
Comparing the methods
| Method | Veneer form | Typical curves | Process | Watch for |
|---|---|---|---|---|
| Wrap a backed sheet | Paper-backed or fleece-backed | Gentle, single curve | Glue to a shaped core, vacuum press | Bend direction, wrinkles |
| Bent lamination | Thin plies or strips | Strong curves along the grain | Glue stack on a form, clamp | Ply thickness, glue creep, spring-back |
| Flexible sheets | Veneer on flexible backer | Tight or compound curves | Glue to a core | Cost, thin face, sanding |
| Pre-bent raw leaf, steamed | Raw leaf, softened | Moderate curves | Steam, form, dry | Handling, finish after drying |
Grain direction and layout
Look at which way each curve runs before you choose the grain direction. Take a convex cabinet front that curves across its width. If the grain runs vertically, the leaf has to bend across the grain, which is the hard direction and calls for a backed or flexible sheet. If the grain runs horizontally, the bend is along the grain and a plain leaf may follow it, though a horizontal grain changes the look of the door. The designer has to weigh the look against the bending.
Columns and round posts show the same trade. The grain usually runs along the length, so wrapping a leaf around the circumference is a bend across the grain, which is why wrapped columns use backed or flexible sheets. A raw leaf with the grain running around the circumference would split less but looks different. Decide the look first, then pick a veneer form that can follow it, and confirm with a test bend.
Gentle curves are more forgiving. A large radius across the grain may work in a thin backed sheet, while a tight radius needs a flexible product or a different construction altogether.
When you plan sequence matching on a curve, remember that the visible pattern changes as the leaf wraps. A match that looks fine on a flat layout can look different around a curve.
Backers
A backer is the main way to bend veneer further than a raw leaf allows. Paper backers are thin and flexible. Fleece backers handle tighter bends and resist splitting. Wood backers are stiffer and stable but bend less. Choose the backer for the curve, the process and the finish. The guide on veneer thickness explains how backing changes behavior.
A backer also affects glue. Paper and fleece take glue differently from raw wood, so check compatibility with the adhesive you plan to use. See glue for wood veneer for common systems. For curved parts, glue with some flexibility and a long enough open time to position the sheet works best.
Moisture, heat and spring-back
Moisture changes bending. Leaves that are too dry crack, and leaves that are too wet can buckle and take a permanent set that does not match the form. Condition stock before bending, as the guide to veneer moisture content explains.
Bent laminations tend to spring back a little when the clamps come off, because the glue has not fully locked the curve. Form makers allow for this by over-bending slightly and by letting the glue cure fully under pressure. Heat-cured glues reduce spring-back, and cold-set glues take longer. Test a sample piece and measure the result before cutting a production form.
Finishing curved veneer
Curves concentrate stress at edges and tight sections, and sanding pressure rises there. Sand-through risk is higher on a curve, so use light pressure and fine grit. See the guide to sand-through risk and face thickness. Finish curved parts as soon as they are stable, and seal all faces and edges so the part does not take up moisture unevenly and change shape.
What to put on an RFQ
Describe the part, not just the veneer:
- Species, cut and grade, plus the leaf or ply sizes needed.
- Veneer form: raw, paper-backed, fleece-backed, flexible or ply strips.
- Thickness, and for bent lamination the ply count and width.
- Curve details: radius, direction relative to the grain and a drawing if possible.
- Process (wrapping, bent lamination or other) plus the press or form type.
- Glue system and finish.
- Quantity, with waste for test bends.
- A sample, plus a test bend report if the supplier has one.
Ask suppliers whether they have bend data for the species and form. A supplier who sells a lot of veneer for bending can often share a recommended radius range. Treat that as a starting point and confirm by testing.
Checklist
- Decide which way each curve runs relative to the grain.
- Choose a method: wrapping, bent lamination or flexible sheet.
- Pick a backer and thickness for the tightest radius.
- Condition stock and make test bends.
- Allow for spring-back and moisture change.
- Seal and finish promptly.
For curved-part veneer quoted by species, backing and thickness, send the details on the RFQ page. The request goes to up to three suppliers that stock that species in that form, with a reply within 24 business hours.
Frequently asked questions
Can veneer be bent without cracking?
Yes, within limits. Veneer bends more easily along the grain than across it, thin leaves bend more than thick ones and backed sheets bend more than raw leaves. Always make a test bend of the actual stock at the actual radius, because species and moisture change the result.
What is bent lamination?
It is a process in which several thin layers of veneer or thin strips are glued together and clamped over a form until the glue sets. The layers keep their curve, and the finished part is strong and stable. It is used for chair parts, curved panels and arches.
How tight a radius can veneer follow?
There is no single figure. The limit depends on species, thickness, moisture, grain direction, backing and glue, so suppliers and shops give guidance for a specific product. Run a bend test on your stock and tighten the radius step by step until it fails, then work at a margin above that.
Know what you need? Send the spec.
Tell us the species, cut, form and square footage. We pass it to up to 3 veneer suppliers that stock it and reply within 24 business hours.
Send my veneer RFQ